Lots of people have been asking how the light painting photos were done. There's been speculation about multiple exposures, unseen spotlights, dark cloth, and even Photoshop (I don't use Photoshop). It's actually much much simpler than that.
- Step 1: find somewhere really dark and put the camera on a tripod. For all of these shots the dark place in question is Costanoa at night. It's a camp site on the northern California coast, about halfway between Santa Cruz and Half Moon Bay.
- Step 2: open the camera's shutter for a minute. For the technically inclined, almost all the pictures were done with an exposure time of 60 seconds at aperture f6.3, ISO 400 sensitivity. Pretty much any SLR, and now many compact cameras, could be configured with these settings; there's nothing special about the camera.
- Step 3: step into the frame with a flashlight and "paint" your chosen design. This is where it helps to have someone as artistically inclined as Matt; in pretty much all of the good pictures it was actually Matt stepping into the frame and wielding the torch. I did one or two, but it's Matt's creative genius behind the really spectacular examples.
The painting itself can take a few forms:
- mid-air painting; just sketching shapes in mid-air. The dinosaur is a great example of a standalone line drawing.
- painting still objects; shine the flashlight on still objects in the background, or on the ground. For the forest path picture, Matt pointed the flashlight at the ground and walked off into the distance, lighting his path in front of him as he went.
- painting people; pretty much anything you want to actually see in the photo you have to paint with the flashlight, and that includes anyone standing in the frame. They must hold very still while you paint them but it can be done in a second or less.
Here's a video showing the process in action. There's not a whole lot to see but it gives you a good idea of how it's all done.
Yes, it's pretty dark! Matt begins by painting the wings, then paints the ground around our subject April (it's this which gave some the impression of a spotlight from above). At 36 seconds in, one wipe of the flashlight over April is enough to paint her into the photo. After that Matt picks up a blue glowstick and paints an aura. The finished result: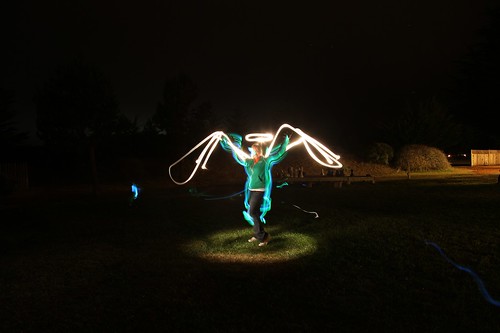
There are lots more of the pictures on Flickr. Diabolical Alexia is one of my favorites; Horse is another.
Here are some of the questions I got asked a lot:
How come the painter isn't visible in the photo?
Mainly because as the painter you're careful not to shine light on yourself. You also have to keep moving as you paint; if you stay in one place for too long then ambient light will indeed put you in the photo as a ghostly blur.
How did you get some of the drawings looking so good?
Matt is excellent at drawing. That's all there is to it.
What's special about the flashlight?
Nothing. It's a regular Maglite (three D-cells). We've also used a mini Maglite (2 AA-cells) and colored glowsticks for different effects.
Got any tips for light painters?
Yes, we learned as we went:
- keep moving. If you stop for too long the ambient light will illuminate you and put you in the picture;
- don't accidentally shine the light on yourself. A few promising pictures were spoiled from leaked light;
- light human subjects quickly, and only once. Most people can't keep perfectly still enough to make any other approach practical;
- turn off lights not in use. Covering a flashlight with your hand while you move will leave a red trail in the picture. If you're carrying glowsticks, keep them deeply buried in a pocket;
- when drawing shapes, point the flashlight at the camera even when reaching up or down. It's natural when painting something above head-level to point the flashlight up into the air. If you do that much of the line will be lost;
- the speed at which you move the flashlight will determine how much light gets painted. Move it quickly for less light and slowly to create very bright patches.
- manually focus the camera on your subject. Leave that focus setting and put a marker in the ground so subsequent subjects can stand at the marker to be in focus
Enjoy!
1 comment:
What a fun experiment.
Your blog is brilliant..as are all of your photos.
Plus, you live in the greatest city in the U.S.
Post a Comment